Installing CADViewer
on a Linux/UNIX server
This page will guide you through the complete CADViewer installation and configuration process.
| SYSTEM REQUIREMENTS -- |
| CADViewer |
470 MB hard drive capacity |
| Perl |
Apache Web Server |
| Apache Web Server |
Version 1.3 or later
12 MB free disk space (for installation)
3 MB space for final installation |
RETURN to top of page
Downloading and extracting the Apache Web Server installer
If you are setting up a Linux or UNIX Web server for CADViewer use and have not already installed the needed web serving application, you can download and install Apache Web Server software as detailed in this section. If, however, you already have an existing and operational Web server, you can skip ahead to "Installing CADViewer".
| WARNING! |
The following instructions on how to install a Linux or UNIX Web server are primitive. System administrators are responsible for making the Linux Web Server works |
- Download the latest version of Apache Web Server from LINK.
| ALERT! |
If you use an FTP application to download the installer, be sure to use the binary mode. |
- Extract the archive file contents by opening a terminal window and typing the following:
| gtar xvzf apache_1.3.12-i686-whatever-linux2.tar.gz |
- When the extraction is complete, you'll find a new "apache 1.3.12" directory at the root, containing all the pre-installation resource files.
RETURN to top of page
Installing the Apache Web Server software
You can follow the installation process detailed in the file "src/INSTALL" (located in the main Apache installer directory), or you can follow the steps in this section.
- Open a terminal window and type the following:
| ./configure --prefix=/usr/local/apache |
- (Or... type your preferred pathway for the new Apache directory in place of the bold pathway text shown above.)
- Press Enter to start the installation.
- When this stage is complete, type the following and press Enter.
This initiates the compilation process.
| ALERT! |
If you experience any "missing file" errors during this stage, you may have inadvertently moved some Linux resource files that the Apache Installer expected to find in specific locations (as indicated by the error message.) You can either relocate those files to the default directory, or contact Tailor Made Software Ltd. Support for assistance. |
- To start the final installation process, type the following and press Enter.
This initiates the process of installing Apache into its own directory.
- When the installation is complete, you can start Apache. To do so, type the following and press Enter.
| usr/local/apache/bin/apachectl start |
This starts the Apache server software--which you should now test according to the instructions in the next section.
RETURN to top of page
Testing the Apache Web Server
- Start a Web browser.
- Click in the Location field and type one of the following two URLs --
| http://[host]/ -OR- 127.0.0.1 |
in which "[host]" should be replaced with the IP address of this Apache server.
If the Web Server was installed successfully, an Apache test page will appear in your browser.
You can now proceed with the installation of CADViewer, as detailed in the next section.
RETURN to top of page
Installing CADViewer
- After downloading the CADViewer Zip archive (from LINK,) open the Zip archive file and extract the contents into this directory:
- The extraction process will automatically create a new "CADViewerPRO" directory, then copy all the CADViewer files into this directory.
- When this process is complete, quit the Zip utility.
You can now configure CADViewer for basic use, focussing especially on activating the "redline" markup features.
RETURN to top of page
Configuring CADViewer
- Create a new directory in the main "CADViewerPRO" directory, entitled "redlines".
| ALERT! |
You can create this directory in any other location--including another networked server. You must, however, note down the exact directory pathway including IP address of that machine, so that you can configure CADViewer to locate and use this directory. |
- Start any text editor and open the file "demo.html" — located inside the "CADViewerPRO" directory.
- Between the "<APPLET>" tags, enter the following parameters -- on separate lines:
| <param name="redline_cgi" value="/cgi-bin/redsaver.cgi">
OR... you can type "redsaver.cgi" in place of "redsaver.pl"
<param name="redline_file" value="/CADViewerPRO/redlines/"> |
- Save these changes and close this file.
- Open the main CADViewerPRO directory-- (usr/local/apache/htdocs/CADViewerPRO)-- and locate this file:
| redsaver.cgi (or... redsaver.pl) |
| NOTE: |
There are two files--redsaver.pl and redsaver.cgi-- that contain the same information, but work with different processes. If you have installed Perl on your server, copy the file "redsaver.pl" into the cgi-bin directory. If not, copy the "redsaver.cgi" file into the cgi-bin directory. |
- Copy this file to the cgi-bin directory:
/usr/local/apache/cgi-bin
- Start a text editor and open the "redsaver.cgi" file you just copied into the cgi-bin directory.
- Insert a blank first line at the top of the file and type the following text:
- Use the Search feature to find the text string "CHANGE ME".
- Delete CHANGE ME and replace it with the pathway to the CADViewer redline directory--making sure that quote-marks wrap the pathway text. The entry should resemble (with some variations) this example:
| "//usr//local//apache//htdocs//CADViewerPRO//redlines//" |
| ALERT! |
Make sure that you type two forward-slash characters between items. |
- Save your changes and close this file.
Configuring the CGI files
- Using your text editor, locate and open the file "httpd.conf" (which can be found in usr/local/apache/conf/.)
- Search for this code--
ScriptAlias /cgi-bin/ "usr/local/apache/cgi-bin/"
<directory "usr/local/apache/cgi-bin">
AllowOverride None
Options None
Order allow, deny
Allow from all
</directory>
|
- Change this entry -- Options None -- to the following:
| NOTE: |
The other ScriptAlias options do not require any changes. |
- Save the changes and close this file.
- Select this file and remove any extra characters from the contents.
- Generate a new file -- redsaver.cgi -- by typing this command:
| perl -pi. ak -e 's/\r//' redsaver.cgi |
As a result, the original file, "redsaver.cgi", will be saved as "redsaver.cgi.bak".
- Open the cgi-bin directory and select the redsaver.cgi file.
- Open the Properties dialog box and verify that "redsaver.cgi" is an executable file. If it is not, make it so.
As a result, an asterisk should appear by the filename.
- Locate and select the redlines folder in usr/local/apache/htdocs/CADViewerPRO/.
- Type this command--
(There should be a space between "nobody" and the closing period.)
This permits all potential Web users to save and open redline files in this directory.
| ALERT! |
If your server is running under UNIX, make sure the CADViewer files and main directory have the needed permissions to allow the Web server to read them as it would read html files. Use the commands 'chmod 755 *.class' and 'chmod 755 obfu.*' in this situation. |
- To create a symbolic link for Apache Web server, type this command:
| ln -s /usr/local/apache/bin/apachectl /usr/bin/apachectl |
- This completes the installation and basic configuration of CADViewer.
- Type the following command to restart Apache Web Server:
Once the restart is complete, you can test the Web server and CADViewer, as detailed in the next section.
RETURN to top of page
Testing your new CADViewer configuration
- Make sure that Apache Web Server, if active, has been restarted.
- Using a Web browser on a separate machine, connect to the CADViewer host server. The URL should somewhat resemble either of these examples:
| http://[HOST_IP]/CADViewerPRO/demo.html -OR- 127.0.0.1 (for local host) |
If the connection is successful and the server was properly set up, you should see a Web page with a CADViewer window in the center -- displaying a generic architectural drawing on a black background.
- Repeat this test with as many different browsers (and browser versions) from as many different computers and operating systems as you can.
RETURN to top of page
Verifying that the host information is correct
When you purchase a license for CADViewer use, the viewer will have been configured to run only on the web server URL you specified when you purchased the viewer. To make sure that the configuration is correct, follow these steps:
- Try using the viewer by connecting to the demo page on the current server — as described in the previous section.
If you installed the CADViewer on the wrong host, a warning window will pop up and the viewer will not appear in the browser window.
Some browsers will not display the warning window while displaying the viewer. Do not assume that the viewer was installed and configured correctly because it appears in this one browser. To verify that the viewer was installed correctly, follow these steps:
- Use a Java-capable Web browser (on a different computer) to reopen "demo.html".
- Open that browser's Java console by doing the following:
| Netscape Communicator 4.x and later: |
Choose "Communicator | Java console". |
| Internet Explorer 4.x and later: |
Choose "View | Java Console". |
The Java console, after opening, should display the status message, "Host verified", and will also display the host name. This verifies that the viewer was configured correctly.
| ALERT! |
If the viewer does not say "Host verified" or a warning window pops up, yet the CADViewer application is running on the web server it was licensed for, please contact support@cadviewer.com for a new version. |
RETURN to top of page
Testing the redline features
At this time, you should test the CADViewer "redline" features, as described in the following steps:
| NOTE: |
If this procedure does not work, you can test the cgi script that enables redline file saving by following the procedure detailed in LINK. |
- Click in any of the Redline tools (shown below) and create a markup anywhere on the drawing.

- Click the disk icon (shown below) in the Redline toolbar.
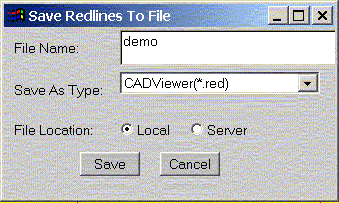
 A Save Current Redlines dialog box appears, as shown below.

- Click the button by "Use Web Server" (if it has not already been selected.)
- Click in the blank text field to the right and type a short name (e.g., "comments") for the file that will contain your test redline markup.
- Click OK.
If the dialog box closes and no error window appears, your redline file was saved in the redline directory.
- To verify that the file exists, click the Open button in the Redline toolbar -- as shown below.
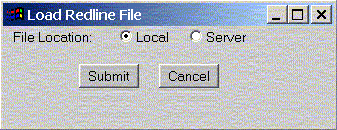
 The "Load Redlines for this drawing" dialog box appears, as shown below.

- To view a list of the names of any redline files, click the button by "Use Web Server, File Name", then click OK.
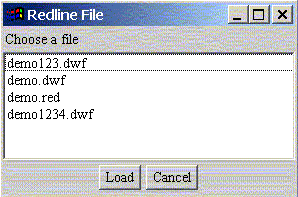
- A "Select one or several redline files" dialog box appears, listing this "demo" redline filename.

- To view the redlines for this drawing, select the file name and click Load.
- Click Cancel to close this dialog box without opening a redline file.
This concludes all of your preliminary tests. Your CADViewer server is ready for use.
RETURN to top of page
Uninstalling CADViewer
To uninstall CADViewer from your Web server, follow these steps:
Delete the CADViewer installation directory and its subdirectories.

 A Save Current Redlines dialog box appears, as shown below.

 The "Load Redlines for this drawing" dialog box appears, as shown below.


 A Save Current Redlines dialog box appears, as shown below.

 The "Load Redlines for this drawing" dialog box appears, as shown below.

