CADViewer, with it’s flexible design and use of standard toolkits, can be integrated with any Database Management Application and be used with a multitude of custom data-driven applications.
This Tutorial
This tutorial builds on top of the CADViewer tutorial Automated Creation of Hotspots, where a base CAD drawing containing space poloygons on a designated layer been made interactive in CADViewer.
This tutorial will outline various ways of:
- 1: Interactively Adding new polygon shaped hotspots.
- 2: Interactively Adding new interactive SVG or bitmap icons.
- 3: Programatically Adding new interactive SVG or bitmap icons through the API.
- 4: Modifying the Interactive Hotspots, created using Automated Creation of Hotspots
- 5: Modifying the interactively added polygon shaped hotspots.
- 6: Modifying the interactively added interactive SVG or bitmap icons.
- 7: Saving interative content through the interface.
- 8: Manipulating interactive content through the API.
- 9: Saving interactive content through the API.
- 10: Loading interative content through the API.
- 11: Loading interactively content through the Icon Interface.
- 12: Working with Layered Space Objects.
The steps outlined below can be tested in our Download versions of CADViewer. Furhermore, use our online reference sample CADViewer_space_objects_canvas_API_640.html as the base for this tutorial
1: Interactively adding new Polygon Shaped Hotspots
Navigate to the last Icon Menu Page in the CADViewer top left Menu bar.

You can add new space objects, currently exposed are Rectangles, Polygons and Circles as commands:
 .
.
Drawing a space object:
These objects will internally in the datastructure be represented with a JSON object that can be retrieved throught the API, see 7: Manipulating interactive content.
In addition to this, our Custom Canvas API allows developer to build their own higher level canvas methods.
2: Interactively adding new interactive SVG or bitmap icons
The CADViewer API can be used to place out Image Space Objects or custom objects on the canvas:
In the online reference sample, two helper arrays has been created:
1: To the upper left, a set of input fields have been added controlling the Space Type, Space ID, and Space SVG/Bitmap Image used when placing out an object on the canvas. When placing out an object, the Space ID field (loadSpaceImage_ID) will be automatically incremented after placement of image.
These fields controls the variables: loadSpaceImage_Location, loadSpaceImage_ID, loadSpaceImage_Type, loadSpaceImage_Layer.
2: To the central left, an image array has been placed out to select graphical objects. Selecting a graphical object from the image array and place it on the canvas, will automatically trigger an increment of the Space ID field defined under 1: after placement of image.
When placing out a space image objects, using either 1: or 2: , the following three methods are used:
- function cvjs_setImageSpaceObjectParameters(),
- function cvjs_setGlobalSpaceImageObjectScaleFactor() (optional) , and
- function cvjs_addFixedSizeImageSpaceObject():
where the JavaScript code is as follows:
        // place the icon on the canvas
        cvjs_setImageSpaceObjectParameters(loadSpaceImage_LocationOrbase64Object, loadSpaceImage_ID, loadSpaceImage_Type, loadSpaceImage_Layer);
        cvjs_setGlobalSpaceImageObjectScaleFactor(1.0);  // 1.0 = no change in icon size
        cvjs_addFixedSizeImageSpaceObject("floorPlan");
Please refere to the CADViewer API and Download our code samples.
3: Programatically adding new interactive SVG or bitmap icons through the API
The CADViewer API can programmatically be used to place out Image Space Objects or custom objects on the canvas. When placing out a space image objects, the following three methods are used:
- function cvjs_setImageSpaceObjectParameters(),
- function cvjs_setGlobalSpaceImageObjectScaleFactor() (optional) , and
- function cvjs_addFixedSizeImageSpaceObject():
where the JavaScript code is as follows:
        // place the icon on the canvas programmatically
        cvjs_setImageSpaceObjectParameters(loadSpaceImage_LocationOrbase64Object, loadSpaceImage_ID, loadSpaceImage_Type, loadSpaceImage_Layer);
        cvjs_setGlobalSpaceImageObjectScaleFactor(1.0);  // 1.0  = no change in icon size
        cvjs_addFixedSizeImageSpaceObject("floorPlan");
Parameter settings
The Space Object images defined in method cvjs_setImageSpaceObjectParameters() can be either SVG or bitmaps.
The parameter loadSpaceImage_LocationOrbase64Object controls the insert object , the parameter loadSpaceImage_ID is a unique ID of the insert object that developers use for control of the object, the parameter loadSpaceImage_Type is the type definition of the object that displays when its click-modal is active, and the parameter loadSpaceImage_Layer defines the layer on which to place the Space Object for on/off control.
The parameter loadSpaceImage_LocationOrbase64Object can take two object types:
- 1: Location of the image object, by either http or relative location.
- 2: A base64 encoded object. If SVG the object shall be of the type: “data:image/svg+xml;base64,codedcontent…." or if a PNG the object shall be of the type: “data:image/png;base64,codedcontent…."
/**
 * Sets the parameters when creating an Image Space Object
 * @param {string} loadSpaceImage_LocationOrbase64Object - location of the image object (SVG or bitmap)  NOTE: the image can also be base64 encoded of type: data:image/svg+xml;base64,PHN.... or  data:image/png;base64,PHN....
 * @param {string} loadSpaceImage_ID - ID of the Image Space Object
 * @param {string} loadSpaceImage_Type - Type of the Image Space Object
 * @param {string} loadSpaceImage_Layer - name of the layer where the Space Object is positioned
 */

function cvjs_setImageSpaceObjectParameters(loadSpaceImage_LocationOrbase64Object, loadSpaceImage_ID, loadSpaceImage_Type, loadSpaceImage_Layer){}
Object Scaling
If the object needs to be scaled at insertion, the method cvjs_setGlobalSpaceImageObjectScaleFactor() can be applied.
/**
 * Sets a scale factor of Image Space Objects when placed out in the canvas
 * @param {float} factor - scalefactor, default is 1.0
 */
function cvjs_setGlobalSpaceImageObjectScaleFactor(factor){}
Object Insertion - using Screen Coordinates
The object is inserted at a given location in screen coordinates (xcor, ycor), by using the method cvjs_addFixedSizeImageSpaceObjectXY().
/**
 * Add a Fixed Size Image Space Object in SVG coordinates
 * @param {string} floorplan_div - name of div containing CADViewer canvas
 * @param {int} xcor - x coordinate in SVG coordinates
 * @param {int} ycor - y coordinate in SVG coordinates

 */

function cvjs_addFixedSizeImageSpaceObjectXY(floorplan_div, xcor, ycor){}
Object Insertion - using Global Coordinates
Insert a Space Object in Global (DWG) coordinates by using the method: cvjs_addFixedSizeImageSpaceObject_GlobalXY
/**
 * Add a Fixed Size Image Space Object in Global (DWG) Coordinates
 * @param {string} floorplan_div - name of div containing CADViewer canvas
 * @param {int} xcor - x coordinate in Global (DWG) coordinates
 * @param {int} ycor - y coordinate in Global (SVG) coordinates

 */

 function cvjs_addFixedSizeImageSpaceObject_GlobalXY(floorplan_div, xcor, ycor){}
When converting an AutoCAD DWG file, MicroStation DGN, Adobe PDF or any raster format using AutoXchange 2024, AutoXchange 2024 creates a tranformation matrix that CADViewer uses for global coordinates, measurement, etc.
<text id="cadviewer_worldUnits">
{ "globalOrigin": { "x": -729.978, "y" : -441.783},
						"units": "mm",
						"svgToWorldUnits": 1.13728
}
</text>
<text id="cadviewer_drawingCoordinates">
{ "DWG":
    { "lowerLeft": { "x": -744.6, "y" : -450.59},
      "upperRight": { "x": 1526.34, "y" : 879.656}
    },
 "SVG":
    { "lowerLeft": { "x": 0, "y" : 1512.93},
      "upperRight": { "x": 2500, "y" : 0.0705953}
    },
 "Drawing Height": 1513
}
</text>
Use the CADViewer API, for methods to directly convert between SVG and Global Coordinates.
The following methods are described in the API: cvjs_getGlobal_X_fromSVG, cvjs_getSVG_X_fromGlobal, cvjs_getGlobal_Y_fromSVG and cvjs_getSVG_Y_fromGlobal.
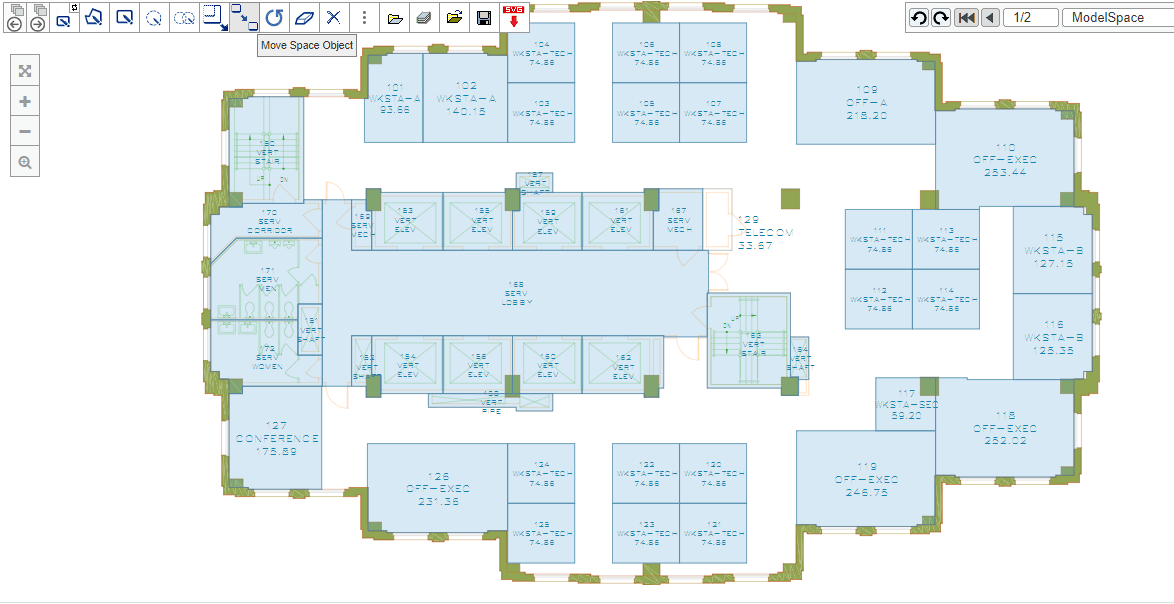
4: 5: 6: Dynamically Modifying Interactive Content
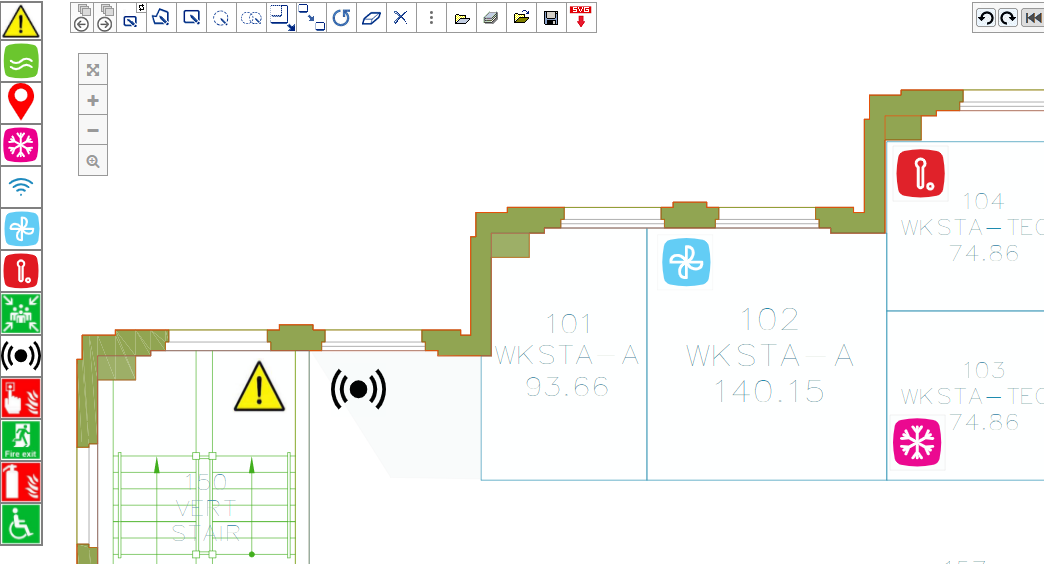
Navigate to the last Icon Menu Page in the CADViewer top left Menu bar.
You can edit space objects, currently exposed commands are: Resize, Move, Rotate and Delete:
 .
.
The interface supports space objects created either through pre-processing or added dynamically, as well as SVG or bitmap image objects.
The interaction process is:
- 1: Select Icon Command
- 2: On canvas, click on Space Object to select it
- 3A: For Resize, Move and Rotate, after selection drag on object to modify the object
- 3B: For Delete, first click on object will delete it
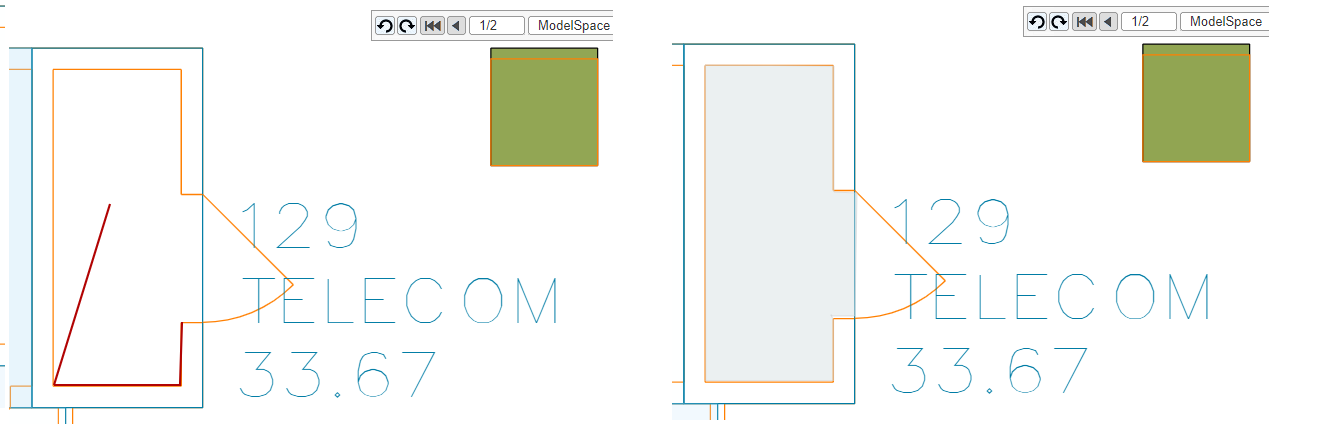
Below is highlight, prior to selection of object for Resize/Move/Rotate:
 .
.
The menu interface additionally allows you to do a number of modifications to your loaded Space Objects
Open the icon command ![]() , select and change the settings of a Space Object.
, select and change the settings of a Space Object.
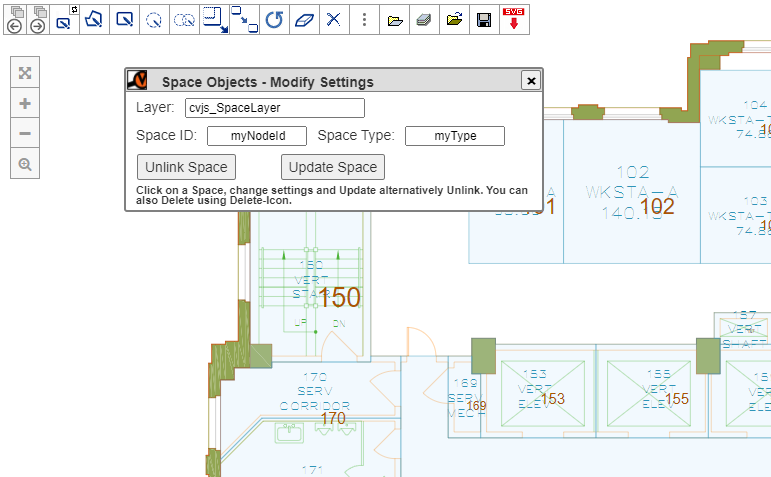
In addition to this, our Custom Canvas API allows developer to build their own higher level canvas methods based on a set of core functionality that involves object selection, creation and manipulation
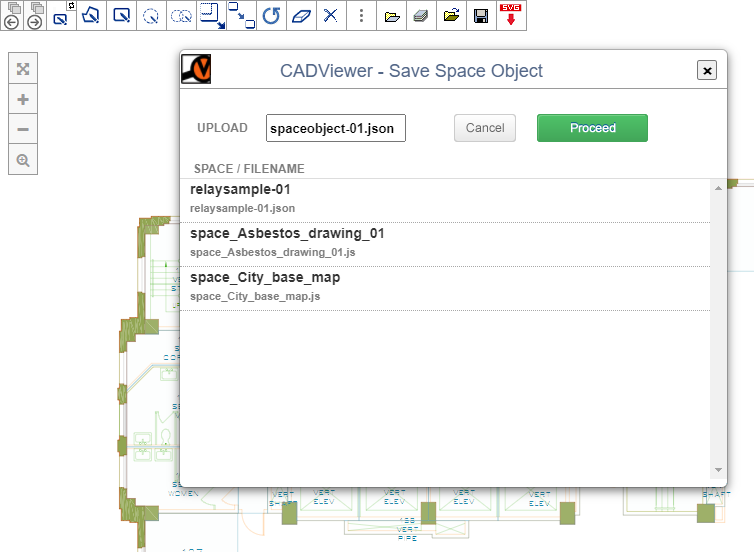
7: Saving interactive content through the interface
When the modification of the Spaces are completed, save of objects can be done through the interface or through the API.
Use the command Save Space Objects ![]() :
:
8: Manipulating interactively content through the API
There are API commands that allows users to manipulate Space Objects through the API, these are retrieval and settings of all space objects, and retrieval and setting of individual objects.
Please see the full CADViewer API and Download our code samples.
Return content of a single Space ID
function cvjs_returnSpaceObjectID, returns the content of a Space Object as a JSON object, that can be manipulated.
/**
 * Return a JSON structure of all content of a given ID: <br>
 * 	var jsonStructure =  	{	"path":   path, <br>
 *								"tags": tags, <br>
 *								"node": node, <br>
 *								"area": area, <br>
 *								"outerhtml": outerHTML, <br>
 *								"occupancy": occupancy, <br>
 *								"name": name, <br>
 *								"type": type, <br>
 *								"id": id, <br>
 *								"defaultcolor": defaultcolor, <br>
 *								"layer": layer, <br>
 *								"group": group, <br>
 *								"linked": linked, <br>
 *								"attributes": attributes, <br>
 *								"attributeStatus": attributeStatus, <br>
 *								"displaySpaceObjects": displaySpaceObjects, <br>
 *								"translate_x": translate_x, <br>
 *								"translate_y": translate_y, <br>
 *								"scale_x": scale_x ,<br>
 *								"scale_y": scale_y ,<br>
 *								"rotate": rotate, <br>
*								"transform": transform, <br>
 *								"svgx": svgx, <br>
 *								"svgy": svgx, <br>
 *								"dwgx": dwgx, <br>
 *								"dwgy": dwgy } <br>
 * @param {string} spaceID - Id of the Space Object to return
 * @return {Object} jsonSpaceObject - Object with the entire space objects content
 */

function cvjs_returnSpaceObjectID(spaceID){}
Return all Space Objects
function cvjs_returnAllSpaceObjects, returns the content of all Space Objects as JSON object.
/**
 * Return a JSON structure with  all Space Object content, each entry is of the form: <br>
 * 	SpaceObjects :[  	{	"path":   path, <br>
 *								"tags": tags, <br>
 *								"node": node, <br>
 *								"area": area, <br>
 *								"outerhtml": outerHTML, <br>
 *								"occupancy": occupancy, <br>
 *								"name": name, <br>
 *								"type": type, <br>
 *								"id": id, <br>
 *								"defaultcolor": defaultcolor, <br>
 *								"layer": layer, <br>
 *								"group": group, <br>
 *								"linked": linked, <br>
 *								"attributes": attributes, <br>
 *								"attributeStatus": attributeStatus, <br>
 *								"displaySpaceObjects": displaySpaceObjects, <br>
 *								"translate_x": translate_x, <br>
 *								"translate_y": translate_y, <br>
 *								"scale_x": scale_x ,<br>
 *								"scale_y": scale_y ,<br>
 *								"rotate": rotate, <br>
 *								"transform": transform, <br>
 *								"svgx": svgx, <br>
 *								"svgy": svgx, <br>
 *								"dwgx": dwgx, <br>
 *								"dwgy": dwgy } <br>
 * @param {string} spaceID - Id of the Space Object to return
 * @return {Object} jsonSpaceObject - Object with all space objects content
 */

function cvjs_returnAllSpaceObjects(){}
Add single or all Space Objects
function cvjs_setSpaceObjectDirect, creates a Space Object struture based on a JSON object array. This method can set single SpaceID or an entire array of SpaceIDs.
/**
 * Using a JSON structure to create a new Space Object <br>
 * 	var jsonStructure =  	{	"path":   path, <br>
 *								"tags": tags, <br>
 *								"node": node, <br>
 *								"area": area, <br>
 *								"outerhtml": outerHTML, <br>
 *								"occupancy": occupancy, <br>
 *								"name": name, <br>
 *								"type": type, <br>
 *								"id": id, <br>
 *								"defaultcolor": defaultcolor, <br>
 *								"layer": layer, <br>
 *								"group": group, <br>
 *								"linked": linked, <br>
 *								"attributes": attributes, <br>
 *								"attributeStatus": attributeStatus, <br>
 *								"displaySpaceObjects": displaySpaceObjects, <br>
 *								"translate_x": translate_x, <br>
 *								"translate_y": translate_y, <br>
 *								"scale_x": scale_x ,<br>
 *								"scale_y": scale_y ,<br>
 *								"rotate": rotate, <br>
 *								"transform": transform, <br>
 *								"svgx": svgx, <br>
 *								"svgy": svgx, <br>
 *								"dwgx": dwgx, <br>
 *								"dwgy": dwgy } <br>
* @param {Object} jsonSpaceObject - Object with the entire space objects content
 * @return {boolean} flag - true if created, otherwise false
 */

function cvjs_setSpaceObjectDirect(jsonSpaceObject){}
9: Saving interactively content through the API
Use the API methods above in Section 7:, to retrieve any JSON content. Then simply pass this object over to your application storage.
10: Loading interactively content through the API
When editing of Space Object for a given Drawing has been completed and saved, it can now be reused next time the drawing is loaded. The Space Objects can be loaded either through the Icon Interface or through the API.
NOTE: Make sure that there is no Space Object processing RL/TL processing in conversion, as only the overlaid Space Objects are needed.
1: In the callback method cvjs_OnLoadEnd() for when a drawing is loaded, use the CADViewer API to load the a flat-file with the JSON objects.
function cvjs_OnLoadEnd(){
        // generic callback method, called when the drawing is loaded
        // here you fill in your stuff, call DB, set up arrays, etc..
        // this method MUST be retained as a dummy method! - if not implemeted -

        // here I can load my JSON Object with Modified Spaces
        cvjs_loadSpaceObjectsDirect("floorPlan", ServerUrl + "content/spaceObjects/relaylock-11b.json");

}
2: Alternatively, programatically load the JSON structure from a DataBase and place it directly onto the canvas using function cvjs_setSpaceObjectDirect() , see section 7: above.
The load and setting of cvjs_setSpaceObjectDirect() content are done inside the cvjs_OnLoadEnd() callback, once the drawing is loaded.
11: Loading interactively content through the Icon Interface
When editing of Space Object for a given Drawing has been completed and saved, it can now be reused next time the drawing is loaded. The Space Objects can be loaded either through the Icon Interface or through the API.
NOTE: Make sure that there is no Space Object processing RL/TL processing in conversion, as only the overlaid Space Objects are needed.
Use the command Load Space Objects ![]() :
:

12: Working with Layered Space Objects
Layered Space Objects are Space Objects where multiple layer of graphical content, SVG or bitmaps, inside the Space Object are organized so that they through the API can be accessed and manipulated similar to layers.
These internal layers can be turned on and off, so the Space Object itself can display, what from a user perspective, looks like different stages.
We will briefly describe how to set up a graphics for a Layered Space Object.
Please note that this sample is implemented in ReactJS on top of dotNetCore and can be downloaded from our GitHub repository: cadviewer-testapp-dotnet-core-react-01
Define variables
First define the general properties of he Space Object, these are an unique ID and Name as well as a Type and the CAD Layer to place the graphics.
import * as cadviewer from "cadviewer";

var loadSpaceImage_ID = "SecureId_" + iconObjectCounter;
var loadSpaceImage_Name = "SecureName_" + iconObjectCounter;

var loadSpaceImage_Type = "SecureObject";
var loadSpaceImage_Layer = "cvjs_SpaceLayer";
Then define arrays to keep the separate internal layered drawings, their state/layer name, and load them in from a server. To make the resulting CADViewer JSON data-file with Space Objects portable, translate the image into a base64 encoding,
Load Images
    var LocationOr64byteEncodedArr = [];    // separate images, as location or base64
    var layerArr = [];  // the state/layer name
    var base64svg = "data:image/svg+xml;base64,";

    LocationOr64byteEncodedArr[0] = CV.ServerBackEndUrl + "/content/drawings/svg/v04/" + jQuery('#layer1').val();
    LocationOr64byteEncodedArr[1] = CV.ServerBackEndUrl + "/content/drawings/svg/v04/" + jQuery('#layer2').val();
    LocationOr64byteEncodedArr[2] = CV.ServerBackEndUrl + "/content/drawings/svg/v04/" + jQuery('#layer3').val();

    var cvjs_LoadFile = CV.ServerBackEndUrl + "/CADViewer/LoadFile";   // server load script

    // define the states (layer names) of the three images loaded in
    layerArr[0] = "closed";
    layerArr[1] = "open";
    layerArr[2] = "lockdown";

    // For each of the objects, do this loop,  here for index [0]

    var js_data = {};
    var content = "";
    js_data['file'] = LocationOr64byteEncodedArr[0];
    jQuery.ajax({
        url: cvjs_LoadFile,
        type: 'post',
        async: false,
        data: js_data,
        success: function (myfile) {
            content = myfile;
        },
        error: function (data_e) { /*window.alert("1 error" + data_e);*/ console.log("Error " + data_e); return; }
    });
    // make the content base64 encoded
    LocationOr64byteEncodedArr[0] = base64svg + btoa(content);
Set up JSON Object
The method cvjs_addLayeredSpaceObject among its parameters, takes a CADViewer JSON Space Object; jsonSpaceObject, with a few settings. In this JSON object, in addition to ID, Name, Type and Layer, the higlight properties of the element can be defined as well as rotation, etc.
    var jsonSpaceObject = cadviewer.cvjs_createNewJSonSpaceObject();

    jsonSpaceObject.id = loadSpaceImage_ID;  // "id_001" can be repeat objects from custom part
    jsonSpaceObject.name = loadSpaceImage_Name; // "Vessel A"
    jsonSpaceObject.type = loadSpaceImage_Type; // "Vessel A"
    jsonSpaceObject.layer = loadSpaceImage_Layer;   // "Vessel Layer"
    //jsonSpaceObject.customContent =  {".customContent" : "all.customContentstructure"};

    var baseAttributes = {
        fill: '#D30000',   // #FFF   #ffd7f4
        "fill-opacity": "0.15",   // 0.1
        stroke: '#CCC',
        'stroke-width': 1,
        'stroke-linejoin': 'round',
    };

    var highlightAttributes = {
        fill: '#a4d7f4',
        "fill-opacity": "0.5",
        stroke: '#a4d7f4',
        'stroke-width': 3
    };

    var selectAttributes = {
        fill: '#5BBEF6',
        "fill-opacity": "0.5",
        stroke: '#5BBEF6',
        'stroke-width': 3
    };


    jsonSpaceObject.defaultcolor = baseAttributes;
    jsonSpaceObject.highlightcolor = highlightAttributes;
    jsonSpaceObject.selectcolor = selectAttributes;
    jsonSpaceObject.rotate = 0;
The application programmer can optionally add custom content to the defined jsonSpaceObject . This is very practical to have higher level information following the element, that the application can manipulate separate of CADViewer. Some sample code for this will look like:
// this is optional!!
    var d = new Date();
    var strDate = d.getFullYear() + "/" + (d.getMonth() + 1) + "/" + d.getDate();
    var strDate2 = d.getFullYear() + "/" + (d.getMonth() + 2) + "/" + 8;
    // users can add custom objects freely designed
    // this is just a template holder
    var customObject = {
        "insertType": "MyOwnObject",
        "generalInfo": { "id": jsonSpaceObject.id, "name": loadSpaceImage_Name, "type": loadSpaceImage_Type, "begindate": strDate, "enddate": strDate2 },
        "dimension": { "unit": "svg", "width": width, "length": height, "rotationInsert": 0 },
        "insertRules": { "initialPositionVerified": false, "positionChanged": false, "infoAdded": false, "inserted": false },
        "logicalRules": [
        ],
        "userAddedInfo": {}
    };
    jsonSpaceObject.customContent = customObject;
Scale and Insert
At insertion, there are a number of controls, the object can be scaled, or the object can be inserted with a given unit and width and height. Set these and populate the parameters of cvjs_addLayeredSpaceObject.
var scale = 1;     // if scale = 1 or null, no action is taken
var width = null;    // null, autoscale, value
var height = null;  // null, autoscale, value

var width = 20;    // null, autoscale, value
var height = 26;  // null, autoscale, value
var unit = "svg";   // svg = svg coordinates,  modelspace  = modelspace units,   mm, cm, m, inch , feet  = using transformation matrix values

cadviewer.cvjs_addLayeredSpaceObject("floorPlan", loadSpaceImage_ID, LocationOr64byteEncodedArr, layerArr, scale, width, height, 0, unit, jsonSpaceObject)
The space objects can now be inserted into the canvas! Please see Modifying Interactive Hotspots on how to scale, rotate and move the objects.
Manipulate a Layered Space Object
The Layered Space Object can be manipulated, using two API commands: cvjs_hideObjectInSpaceObjectGroup and cvjs_showObjectInSpaceObjectGroup.
The methods take as parameters the NodeID of the SpaceObject and the layer or state name defined at initialization. For this sample it was:
    // define the states (layer names) of the three images loaded in
    layerArr[0] = "closed";
    layerArr[1] = "open";
    layerArr[2] = "lockdown";
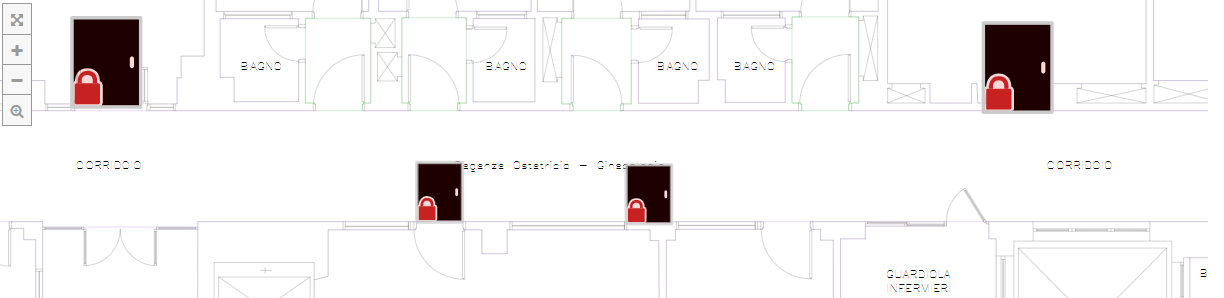
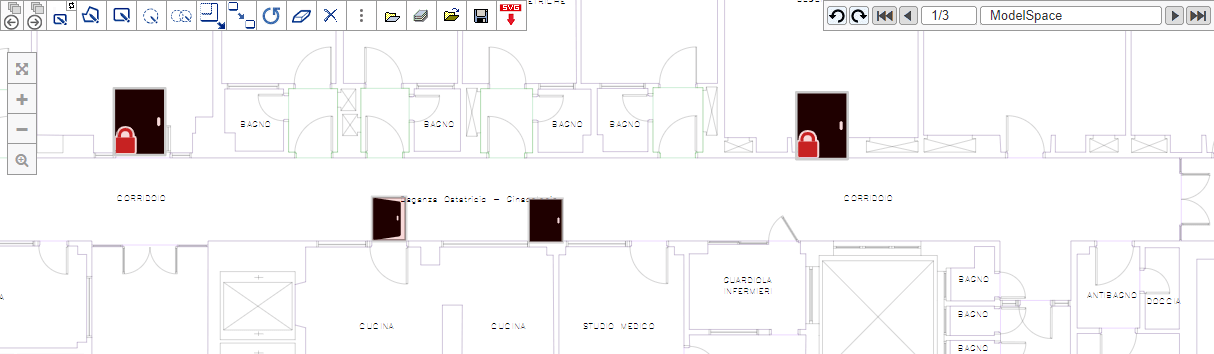
The following method will run through all Space Objects, then for each object show only the lockdown layer, and hide the open and closed layers.
function lockdown_all() {
        // note - we loop over all objects
    var spaceObjectIds = cadviewer.cvjs_getSpaceObjectNodeList();
    for (var spc in spaceObjectIds) {
        var node = spaceObjectIds[spc];
        cadviewer.cvjs_hideObjectInSpaceObjectGroup(node, "open");
        cadviewer.cvjs_hideObjectInSpaceObjectGroup(node, "closed");
        cadviewer.cvjs_showObjectInSpaceObjectGroup(node, "lockdown");
    }
}
Before Execution of Command:
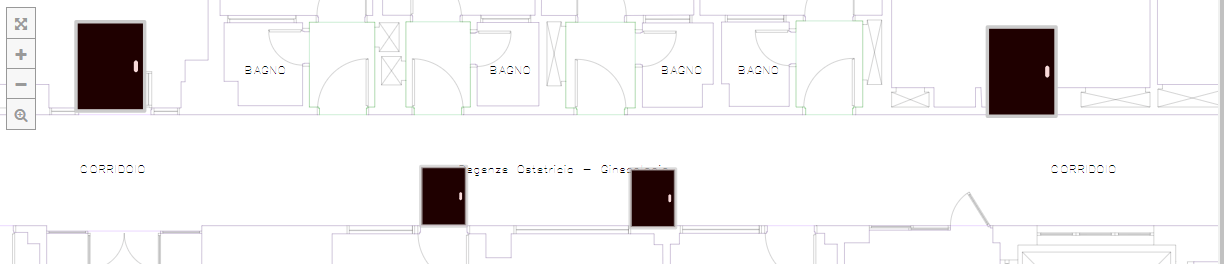
And After execution of Command: